How to install my thermal printer on a Windows PC ?
Follow the installation and configuration steps to use your thermal printer with myDPD for Business on a Windows PC
How do I set up my thermal printer on a Windows PC ?
1. Connect the printer to the computer
- Connect the printer: Use the USB cable supplied to connect the thermal printer to your computer, or connect the printer to your local network.
- Turn on the printer: Make sure the printer is turned on.
2. Download and install the drivers
- Download the Seagull Scientific driver: We recommend using the BarTender driver published by Seagull Scientific, which is compatible with most thermal printers on the market (Zebra GC, GK, and ZD series, Citizen CL series).
-
- Run the installation file: Open the downloaded file and follow the on-screen instructions to install the drivers.
3. Configure the printer on Windows
-
- Open Settings : Go to the Start menu, then search for and open Settings.
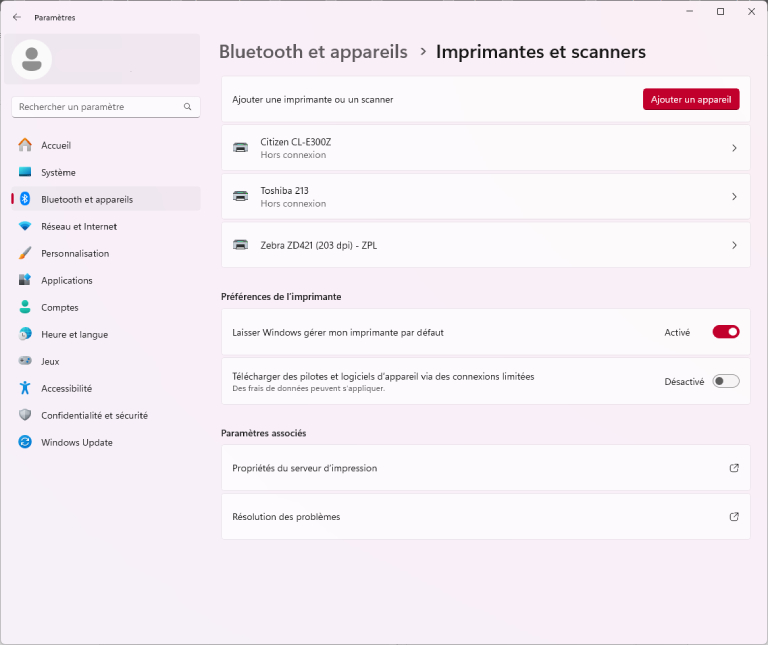
- Access "Printers and scanners": Click on the "Bluetooth and devices" section, then "Printers and scanners" to display all connected printers.
- Add a new printer: If the thermal printer is not detected automatically, click on "Add a device" and follow the add printer wizard.

4. Configure printing preferences
- Open Settings : Go to the Start menu, then search for and open Settings.
- Access "Printers and scanners": Click on the "Bluetooth and devices" section, then "Printers and scanners" to display all connected printers.
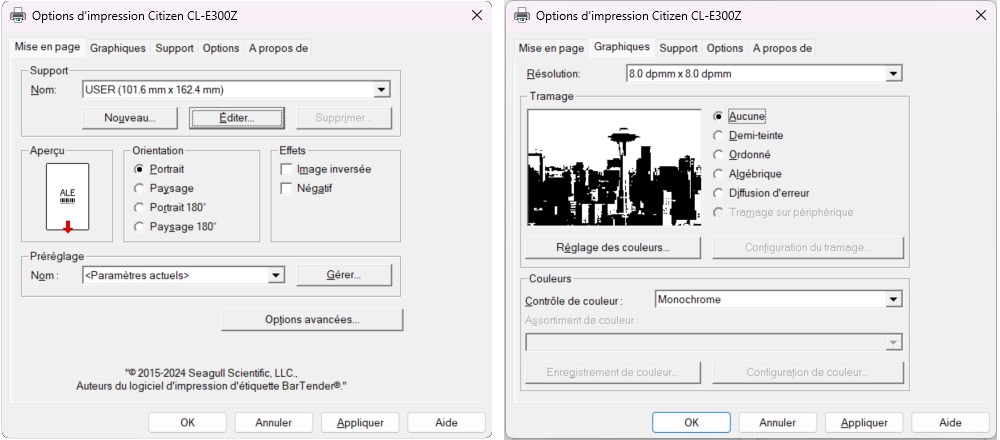
- Select your thermal printer: Click on your thermal printer and go to Print Preferences. A new "Printing options" window will open
- Make the following settings:
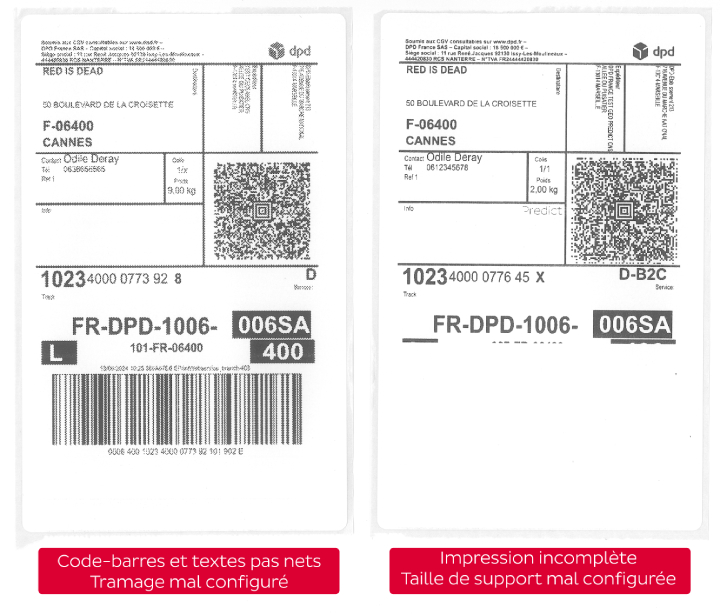
- In the Layout tab, check that the media size matches that of your consumables in millimetres (rolls supplied by DPD France: 101.6 mm x 162.4 mm).
- In the Graphics tab -> Dithering: select None.

-
- Save the settings with OK.
5. Test printing
-
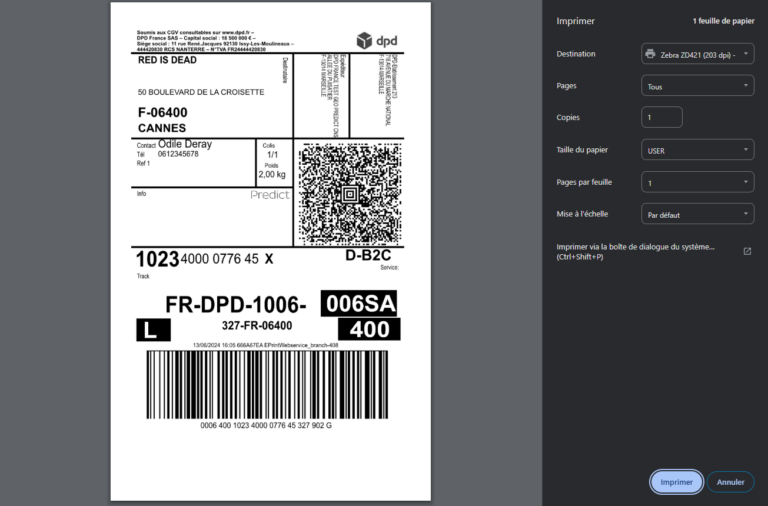
- Create a test shipment: Go to the myDPD for Business application, Shipping tab. Create a shipment by selecting the "Thermal printer" option to the left of the "Create" button, then click "Create".
The application will then prompt you to print the label: check in the preview that the label fits correctly, occupying the space available on the consumable. Click Print.
You can then cancel the shipment created if necessary.
- Create a test shipment: Go to the myDPD for Business application, Shipping tab. Create a shipment by selecting the "Thermal printer" option to the left of the "Create" button, then click "Create".

- Check the print quality: Once the label has been printed, check the print quality of the label, so that it can be correctly read in our network. The DPD logo, texts and barcodes must be clean, without smudges or dotted lines.

Additional advice
- Check for driver updates: From time to time, check the manufacturer's website for driver updates that might improve performance or add features.
- Use compatible labels: Make sure you use labels that are compatible with your thermal printer model for the best printing results.
- Clean the printer regularly: Regular cleaning of the print head and rollers can prevent jams and ensure optimum print quality.
By following these simple steps, you can set up and use your thermal printer to print your labels quickly and efficiently. For further assistance, please consult your printer's user manual or contact our IT support team.
Parcel shipping for business and private customers / How to install my thermal printer on a Windows PC ?

